
The life of a UX designer can often be lonesome, being the only person with that set of skills on the team or even in the company is not uncommon. You might sit totally by yourself in your own one-person-department or you might be part of a team, but working in silos.
When you are part of the team, you would think this would not happen. But the cross-functional team principle of agile is often thought to mean that every person on the team should be able to do everything to bring the product forward, i.e. producing code, and seemingly mitigating risk by being able to cover for each other. This usually means that the UX designer has to code (and hence contribute!) or that all coders together create some half-assed user experience during the development cycles based on a delivered wireframe. This is clearly not getting the most out of the development process to actually deliver value. If you are in this situation, it is time to collaboratively produce a user experience with your team mates that will give great benefit to the customer.
Leah Buley (of Adaptive Path) came up with a design method a few years back under the name of UX team of one. This method has been the foundation of my work since then and I can strongly recommend you to try it out. Its aim is to make sure that you leave your silo as much as possible, getting maximum feedback from your environment, but at the same time avoid the design by committee-problem. There are three phases in the method:
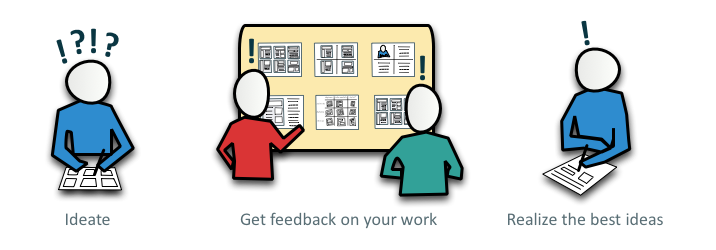
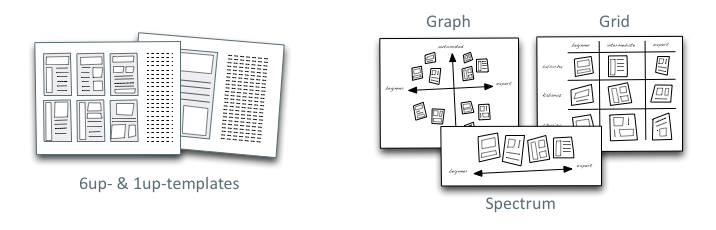
In my opinion, the easiest way to ideate is to work with a template. I use a 6up-templates to create (at least) 6 different possible solutions to a problem. The template consists of 6 small boxes on an A4-paper. The size of the boxes forces you to sketch roughly and not consider details. I decide before sketching if I am doing a spectrum design (6 different sketches ranging from what fits the beginner to what fits the expert, or any other characteristic on the axis), a graph design (2-dimensional) or a grid design (1 sketch per grid element). Sometimes I use the 1up-template to show the best idea in more detail so that it is easy to understand.
After I’m done ideating (i.e. creating a lot of different versions to a solution) I put the sketches up on a wall to create a sketchboard (shown as a yellow board in the method figure above) so that everyone can see them and give feedback. This sketchboard will also contain any other kind of information or notes about the design problem, such as the user story card, specific requirements and limitations, the persona that will use this solution, etc. The reviews of the sketchboard can take different approaches. Some people just like to discuss the sketches, some use post-its to write comments and on some occasions we use dot-voting to decide what sketches are good solutions.
The actual realization of the outcome from the sketchboard can be in any form, but I like to keep it fairly lo-fi and create prototypes in Balsamiq. These can then easily be tested with actual users and since they are still in low fidelity, the user dares to comment on them.
So, this method allows me to only deliver what gives value at the moment, such as sketches on a sketchboard for a feedback session. But, I am still working in my silo. Hence, I recommend using the collaborative Design Studio method for ideation.

The goal of Design Studio is to come up with a solid foundation for further design collaboratively in the team (where the team can consist of almost anybody, including stakeholders and developers). It can be broken down into 4 (or 5) steps.
- Illuminate – In the first step, the team reaches a shared vision of the problem and set the boundaries. One way of getting there is to brainstorm about the current situation. To reach this understanding could take a long time. My opinion is that it is of outmost importance that everyone understands the situation, so let this part take its due time.
- Sketch – Let everyone in the team (including you) sketch using a timebox of about 5 minutes in the second step. It is important that the sketching is quick, since giving people time gets them stuck on unnecessary details.
- Present – In the third step, everyone shows their design in a short presentation, quickly followed by…
- Critique – An open discussion about the design, meant to churn out the key issues and inspire the other members for the next sketching iteration. The critique should focus on the few most important parts of the design.
- Iterate – Run the last three steps 2-4 times depending on how much time is left after step 1. Iteration is the key to finding reliable solutions.
The overall rule for Design Studio is to never dwell on details (with the exception of the illumination phase), to get most value out of the least amount of time. After a Design Studio session, I, the UX designer, have plenty of material to work with when returning to my silo.
(Addendum: Here is a deeper explanation of the Design Studio method)


Leave a Reply
Want to join the discussion?Feel free to contribute!